Sunday, March 30, 2014

Five pillars of Islam

Assalamualaikum wr wb,

NulRK3a.png
Pic courtesy of http://onehallyu.com/

I was thinking of a good way to get RG started on learning the Pillars of Islam.. the whys and the whats can come in later, at this stage I just want her to know what the 5 pillars are.

This was done over a course of a week. and inshaaAllah.. I hope to keep reminding this to her every once in a while. The key to remembrance of knowledge is easily practice, that's why every one of the pillars of Islam is actually a ibaadah, the knowledge gained is put into practice on a daily, monthly, yearly etc basis. 

But since she is still learning the practicing part, for now I just wanted her to remember what the pillars are. In order to do this, instead of just writing down and asking her to memorize this, I approached this i a step by step method.

Step 1: Exposure

One night, I explained to her that everything in this life should have a strong base and pillar. (okay, she really had trouble understanding what a pillar is despite me even showing her.. so I am still figuring that part out)

I told her in Islam we also have 5 pillar that hold us strong to fight shaitaan. Allah loves it when we do this.
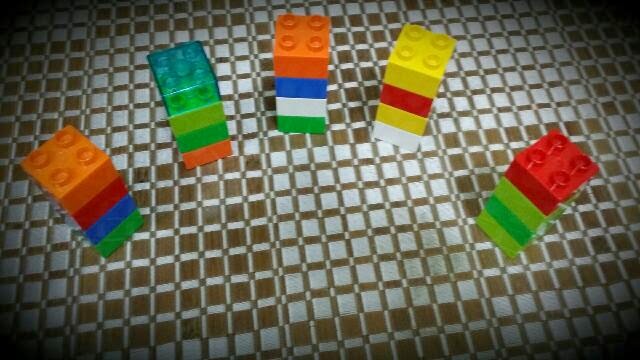
so I just put down 5 Lego towers as 'pillars' and named all the pillars in a way she would understand.

  1. Shahaadah  - I told her Allah is one and Muhammad is our messenger (just asked her to remember that Allah is one!)
  2. Prayers- no explanations needed 
  3. Fasting - little explanation since she had a basic idea what fasting was during Ramadan last year.
  4. Zakah - this was tricky. I just told her that we need to share whatever we had with other people who needed it more (key word being: Sharing)
  5. 5. Hajj - this was hardest but I just told her it was a masjid that all Muslims go to pray at least once in a lifetime.


5 Pillars

Step 2
This step is just to remind her of the pillars for the next one or two days. Why is this important? This webpage (link below) explains well why without review, most information will be lost from memory and the best time to review materials is within a day or two after the material has been presented. 

It also outlines beautifully that over time what we learn FADES. A study states that 

After 1 day54% was remembered.
After 7 days35% was remembered.
After 14 days21% was remembered.
After 21 days18% was remembered.
After 28 days19% was remembered.
After 63 days17% was remembered.

To read the whole article click here. So naturally RG didn't remember much from the day before but I just reinforced in anyway.


Step 3
Now to engage different parts of her mind and use different senses. Before this was audio coupled with visually associated learning (pillars). So I tried a different learning approach; kinesthetic learning - that is learning by touching, feeling and experiencing what one is trying to learn.

We found a magazine and I helped her to find images that closely correlates to each of the pillar (she did need some help with this) :

  1. Shahaadah  - we just found a picture that signifies Allah is one
  2. Prayers- Picture f people praying
  3. Fasting - this one we just found a bunch of people eating and put a big X over it.
  4. Zakah - people giving money.
  5. Hajj - simply the picture of kaabah


that's her decorating the pages after sticking
the finished page
Step 4
Reinforce this message in a fun way! I let her listen to Yusuf Islam's"I look I see album" with a nasheed about the 5 pillars -its called the 5 noble pillar. Awesome stuff!


The result: she now can name them all in her own way.. after this is letting her learn what each signifies, I hope InshaaAllah!


and I have an idea for step 5 which I think will share once its done after a few weeks! 

Wednesday, March 26, 2014

Impasto Pencil holder: A work of art

I don't have a pencil/pen holder in my office. so I thought of getting one. Then I thought I might as well get safeerah to do one for me!

So I bought a plain wooden box holder (RM3.90, that's about 1.20 US Dollar) and set up the workspace for RG. The red flowers are just stickers and the plastic flowers salvaged from a hantaran (wedding gift).

The stuff needed:

Items needed (we didnt even use the sticker nor the flowers)
and I let her paint. This activity took her about 45 minutes.
She used really a lot of paint making the painting thick! I wonder if this can be considered impasto since her brush strokes are so visible and the paint extremely heavy.. 

Artist at work

but it turned out real wonderful and is sitting  proudly at my desk at work!


View from one side
The other side
At my desk!!! i love it!

Sunday, March 23, 2014

Kinetic sand : Two kids, One toy

Assalamualaikum and Good Day people,


this was an interesting activity to do. i did this at two different times. at first RG was asleep so i let GJ play. then when GJ was napping i let RG play.

the toy? i found this Kinetic Sand thing from a friend and got a small amount of it for the kids to play with (about 1 kg of it). the brand i got is this. but better explanations are given here


Malaysians, you can get yours here: RizqiRuse

what is kinetic sand? the company brands their item as 98% sand, 2%magic. but it is basically sand with some polymer additive that makes it 'wet' and kind of sticks to itself. is it mess free? personally i feel it is not. since the sand goes everywhere like sand does BUT having said that it is easy peasy to clean it up since it DOES stick to one another and not fly away everywhere.

ok... here is part one:

SENSORY PLAY with GJ

i let GJ have a free reign on this. he was curious (in fact he a really curious baby!!!) at first, then moved in on touching the sand. his first reaction? he hated it... hahahahah it was really cute to see him brush of his hand and the disgusted look on his face!

after that his curiosity wasn't sated. it was a love-hate relationship.. he touched the sand briefly, then shook his hands free..

then he rubbed the sand between his fingers. (i forced his hand into it, simply to see his reaction.. he didn't like it). i took some sand in my palm and offered it to him... he touched it and slowly felt it from my palm..

i added some tools, now that.... he liked! he poked the sand with the tools. but most of all, he started to take the sand and throwing it everywhere!! after about 20 minutes, he still couldn't place the feeling of touching the sand.. he wants to play with it but when he touches it he throws the sand everywhere..

but one thing for certain, when i ended the activity some 30 minutes later, he protested REAL loud. the place was a bit messy but like i said its really easy to clean up.


look at that curious face!
Feeling braver after a while
Tools! i like em!

Part 2:

Now its time for RG to play with the sand. since she is a whole 3 years older, the structure of play was better. i gave her tools from the start so she started sculpting, digging, excavation and moulding the sand. the tools i used? all of them are just from her playthings; kitchen utensils, hardware tools (toy version of course), plastic containers etc.

I hid some small items in the sand for her to find. She also made simple sand sculptures. to her, it was like playing with a different kind of play-doh... and now she wants to go to the beach!

Digging for hidden treasures!
It does look like real wet sand
Some of the sand sculptures we made.
Same toy: different learning opportunity for both baby and a preschooler! and no, i am not going to try to let them play together with this yet. hahahahhahahah!

have fun y'all!

Thursday, March 13, 2014

Corrugated paper fun


Okay, i didn't take many pictures for this activity. mainly because i was really tired and wanted to finish the activity quickly.. but then once we got into it it was kind of fun. the source for this material? it was just pre-cut coloured corrugated paper i found at a stationery shop near our place. 

the items needed for this activity
1. corrugated paper (pre-cut is faster but you can cut your own)
2. Six icecream sticks (wide ones)
3. Glue
4. Scissors

Then we just rolled them up to make a butterfly, a penguin, a snowman, a ladybug, a heart and a round creature (RG's creativity)

the googly eyes was an extra addition by RG.


Basic items; and lappy for ideas.
.
Finished items!

RG really loved her puppets (i thought they were pretty bookmarks). 

Tuesday, March 11, 2014

RG's First Peek A Boo Collage

Okay, this activity need little planning and the best part you can use any bits and scraps of paper. this was the first time RG did a collage. whats a collage?
Collage (From the French: coller, to glue,) is a technique of an art production, primarily used in the visual arts, where the artwork is made from an assemblage of different forms, thus creating a new whole. (from Wiki).

Well, todays' activity not fully collage but it was collage with a twist. since its her first time, i wasnt exactly focusing on a themed collage or a collage with a certain topic or educational outcome in mind, i was rather focusing on her fine motor skills. 

but how important collages are in learning? You can read about it here. but basically, young children can work with simple collage materials and beads to introduce numbers, positive and negative space, classification, and sequencing and pattern recognition. 

Items needed:

Glue
Bits and Pieces of paper (we used printed paper just because thats what i had in hand)
2 pieces of construction paper


First i had RG draw random shapes and lines. no right or wrong here.. anything goes!

RG drawing curved lines

Then i helped her cut out (using a sharp art knife) random holes according to the pattern RG drew.


Now comes paper cutting time.. RG just went crazy cutting pieces of paper... some of the print has hexagonal shapes so for some of the shapes she ahd a guideline that she had to follow. this activity is in line with preschool skill of learning how to cut.

Cutting time!
then comes the gluing part.  since the pieces were many after a while RG lost her interest. note to self: the next time i should be trying a theme based collage OR try not to cover every inch of the paper. but in this instance, every part of the page was covered. she also used stickers at the end.

Gluing time!
The finished project. 
Voila! when its closed it looks like this!!!

A pretty cool activity!

Sunday, March 9, 2014

Initiation of GJ into our activities..

Ok, finally we got GJ into our activities. first, both were already fed so i guess the mood was good enough for the big one to accommodate her brother and the small one not to cry so much. hehe...

this was just a simple drawing with crayon. i got RG a set of crayola for her birthday last week, so we used that set today... i gave them each a page from RG's art book and gave them the crayons. and just sat back and watched...

GJ pretty much got the idea that crayons go to paper... but in between he decided that he wanted to taste the crayons too... so he needed a bit of supervision... but other than that it was good fun.


GJ at first just holding and watching RG
GJ writing at the EXACT same spot as RG much to RG's chagrin
GJ's first solo art
A collaborative art between RG and GJ.. with RG being blue and GJ being brown
RG's abstract umbrella

Friday, March 7, 2014

LEGO!

Okay.. the past few fays was horrendous with both GJ and RG being sick and the mommy too.. RG got worse and is currently in recovery mode..

Tried to get her to eat oats this morning and due to tiredness i broke parwnting rule no1: i bribed her... told her she can have a special surprise if she ate her oats porridge.. which she kind of did..

So what followed was RG building her lego aircraft.. with little guidance,  she did it! And she is mighty proud of herself...

Thank god she has the love for lego just like mummy.. hahahaha... 

Wednesday, March 5, 2014

Express activity: RG's Art Glass

Salam and Hello everyone,

i was just coming back from work and RG was a bit cranky. i wanted to do something quick and brainless (for me but not her! LOL)...

These are the stuff i gave her:

1. Piece of paper
2. Her old box of coloured pencils/crayon/marker
3. 8 pieces of butterfly wood buttons (that i picked up ages ago).

and i asked her what she wanted to do with it. hehehe sneaky of me isnt it? i dont have to think for her instead, i am making her think. but to my surprise, RG told me she wanted to make something called 'RG's art Glass' where she was gonna draw a glass (well, she didnt, she asked me to outline a large glass), then fill it with water and put the butterflies in the glass.

so thats what she did.


The skill learned in this is to colour within lines
She wanted to colour each of the butterfly but decided against it after the first three.
After adding a straw, her art is done!

Tuesday, March 4, 2014

Phonics fun

Hello everyone... a quick way to get your preschooler to practice phonics.. this is what i discovered (by accident)...

While in the car going somewhere (school, grandma's etc) make a game out of phonics! Spot a word like tree.. say out loud 'tree!'

Then stress the phonetic sound of first letter.. 't.. t.. '(just the sound of the letter mind you)

And then ask her to guess what letter makes that sound..

RG said 'T!'

Then let your child choose the next word and you stress the sound of the first letter and make her guess it..

We went on like this for 20 mins.. then she got tired.. this method is just re-inforcing what she learns in a fun way!!

For beginners, try using the leapfrog video alphabet sounds Letter Factory to begin with.. RG found it very engaging! Ill post the link in my fb page..

Or you can just you tube it!

Monday, March 3, 2014

Math: Repetitive Pattern

Hello... RG got a new block puzzle set a few weeks ago. the set comes with a small booklet of of tangram puzzles you can make using the shapes, either a cat, flowers, rocketship etc.

After doing that for a better part of the day, later that night we used the pieces of the puzzle to learn simple math!

The first activity: Learn math through repeating patterns

What does that mean?

A repeating pattern is a cyclical repetition of an identifiable core. The core is the shortest string of elements that repeat. For example:

Repeating Pattern 

This is a repeating pattern in the form ABB, since it has three elements -- blue, red, red -- as the core.
(read more about that here.. Defining Reasoning and Proof)

we had two levels of pattern identification in this activity:

1. first being simple repetition of colour (blue, pink, blue, pink)
2. Then we moved to shapes (rectangle, circle, rectangle, circle)
3. then we upped the ante. i gave her both colour and shapes. ypu can see the figure below. The more complex the pattern, the more sophisticated the reasoning involved and in this case RG has to reason both the next colour that came in the sequence and which pattern of that colour. 

it was really fun to see her compute how this works for the first time. after awhile she got the hang of it. 

Picture showing the slightly more complex pattern identification (well, for a 3 year old haha)
once she got tired of that, we did basic addition. i dont think RG still has the concept of addition understood, though she could count (a little). but we did it anyway as an exposure that can be shelved in her mind for now. the pictures are self explanatory. 


Simple addition

Allowing RG to visualise simple equations.


The whole activity took about 30 minutes to do. but it was worth it!

Sunday, March 2, 2014

Glitter Sea World


Hello all,

its been a while since i had the time to publish anything due to work commitments (but i have been periodically documenting them on Facebook). so this week will be a lot of backlog posts being published amidst new ones we do in the meantime too.

this activity is very simple. the objectives of this activity:

1. Experimenting with new materials (first time for RG to use glitter)
2. A semi 3D art 
3. Experience in handling glue (though i admit after a few disaster, i ended up applying the glue for her)

The steps are explained below:

1. Choose favorite theme: we chose sea world due to RG's favorite theme that week: shark. luckily we had a storybook at home with these cutie pie pics of sea creatures. in a different setting i would have let her draw but considering it was already late i just quickly outlined the following picture on to a black mounting board.


Such cute sea ceratures!

At first we tried using a dropper/spoon to nicely spread the glitter but later found out good ol' dirct sprinkling is still the best. 

That's RG holding up her final product.


the next day we finished up the second black mounting board, this time going freestyle art. i'll post up the pic later. both of it residing on the home fridge right now.